Original Post; June 18,2017
Updated November 27, 2018
After months of research and deliberation I finally took the plunge and purchased a new Godox AD360ii-C. According to the manufacturer, the speedlite is rated at 360ws and sports a guide number of 80m/262ft @ ISO 100 when measured using the standard reflector without the diffuser. As an aside, with the exception of Impact, I’ve yet to find a flash manufacturer that doesn’t seriously exaggerate their Guide Numbers (GN). It’s always best to measure them yourself.
Unlike speedlites that use replaceable AA batteries to power the flash, the AD360 uses a separate external lithium battery pack which makes it more like a Quantum Qflash X5dR than a run-of-the-mill speedlight.
Note: All information regarding the Godox AD360-ii-C also applies to the Flashpoint Streaklight 360. The Flashpoint Streaklight 360 is maketed by Adorama in the US. All accessories, cables, radio triggers, that work for one will work for the other. With the exception of stenciled text, these units are identical. I now have one of each so I can attest to their interchangeability.
Since I’m a Canon user, all comparisons are made against Canon equipment. This flash unit can also be purchased as a Nikon compatible (AD360II-N) version.
This review includes the Godox AD360II-C, PB960 Battery Pack, X1T-C Transmitter and the X1R-C Receiver.
Godox AD360ii-C Overview
(shown below w/ reflector & diffuser next to Canon 600EX-RT)
As you can see the AD360 is quite a bit larger than the Canon 600EX-RT. In order to provide the extra power, the speedlite requires larger capacitors; with larger capacitors comes the need for a larger housing to contain them. I’m also quite sure there are some larger heat sinks as well. You’ll also note that the flash tube is quite a bit larger than Canon’s 600EX-RT.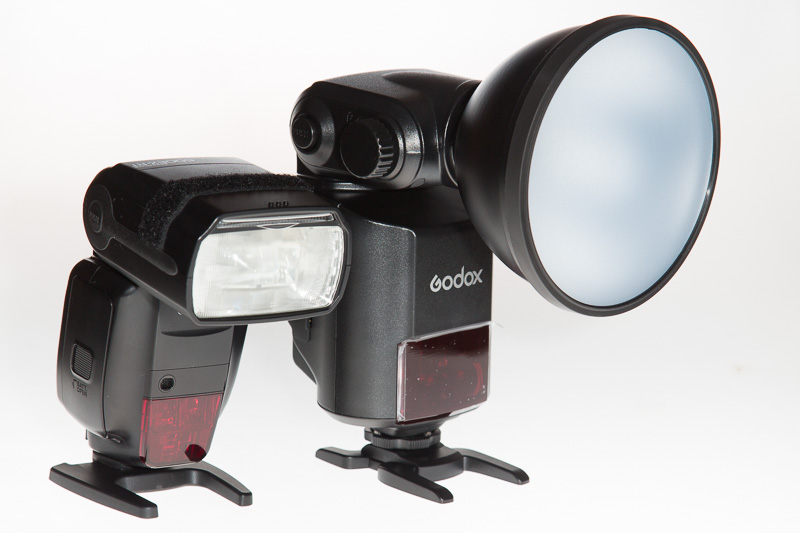
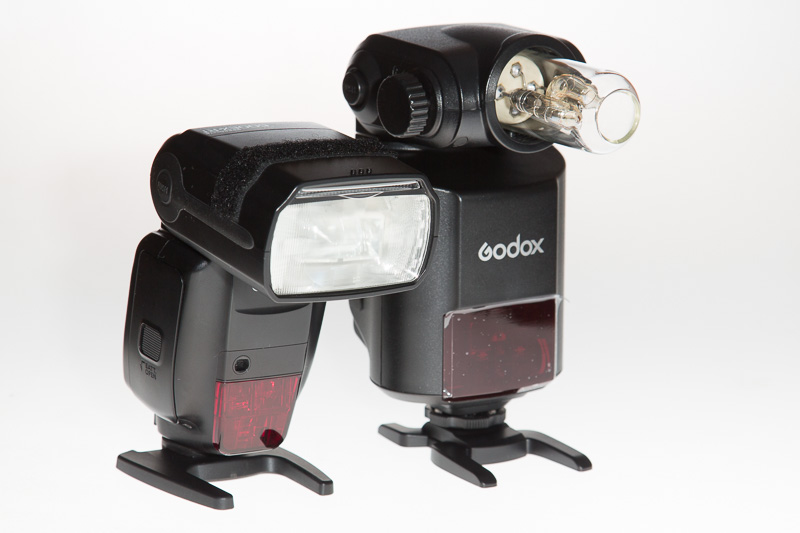
Canon 600EX-RT / Godox AD360ii-C (shown below – bare bulb)
An advantage of the AD360 is it’s ability to shoot bare bulb; this is extremely useful when using the flash with soft-boxes. Also, unlike most studio strobes, the actual flash tube is housed within a glass housing which allows you to use your bare fingers to insert or remove the tube.
Full TTL capabilities (on camera or off)
Whether you buy the Canon (AD360ii-C) or Nikon (AD360ii-N) version, they both have full eTTL/iTTL capabilities. The receivers are built-in but you do have to buy a relatively inexpensive transmitter, X1T-C for the Canon, X1T-N for the Nikon.
Being a Canon user I have both the Canon 600EX-RT flash units along with the associated Canon ST-E3-RT Speedlite Transmitter. I also have a few Youngnou 600EX-RT speedlites that work seamlessly with the Canon speedlites and transmitter. Needless to say that although the Godox and Canon transmitter use 2.4GHz as their transmission frequency, they are not interoperable. So if you want to use the AD360ii with your existing speedlites you’ll need to purchase the Godox X1R receivers.
A couple of weeks ago I tried out a colleague’s AD360ii-C and attached my Canon ST-E3-RT radio transmitter to the hot-shoe of the Godox X1T-C transmitter. I was able to invoke a pre-flash so I incorrectly assumed I could mount both Godox and Canon triggers and control both flash systems. Now that I have my own unit, I was able to do more extensive testing and the units really don’t play well together, at least not in TTL mode.
Godox Wistro AD360II-C Flash Unit [menu] 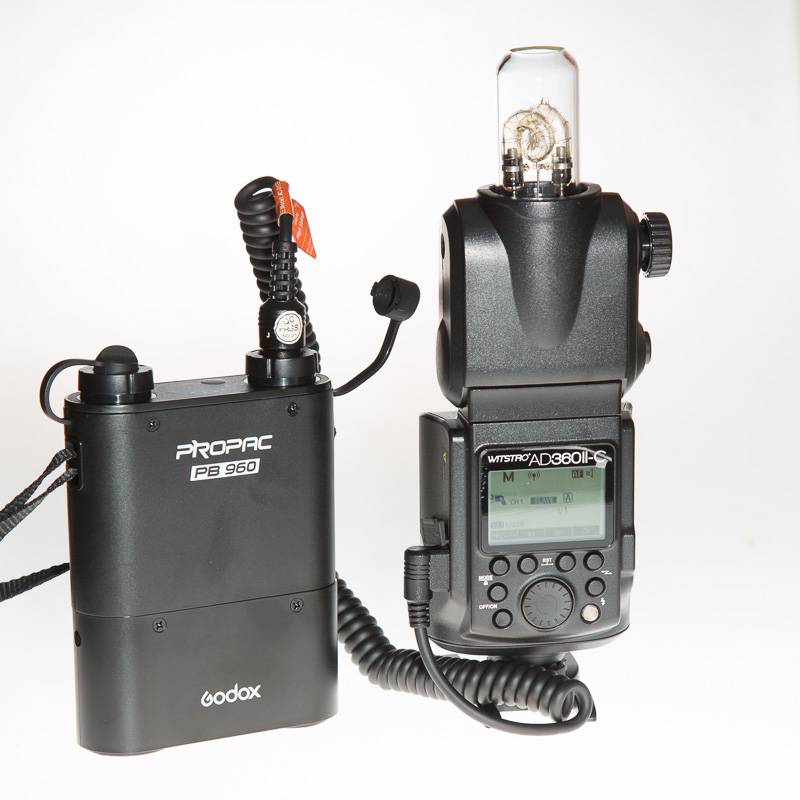
This is a large and hefty unit that weighs in at almost twice the weight of a canon 600EX-RT. While it ships with a default Hot-Shoe, it also comes with an additional mounting plate that allows you to replace the hot-shoe with a standard 1/4-20 screw mount that will allow you to connect this unit to a light stand.
WARNING: There are written warnings against attaching this flash directly to the camera’s hot-shoe. It further states that because of the weight of the flash, the camera’s hot-shoe may not be able to support it without damage to the camera.
The weight differences:
| Godox AD360II-C (with Reflector & Diffuser) |
= 2lb 1.2oz (33.2oz) with reflector |
| Godox AD360II-C (Bare Bulb) |
= 1lb 13.9oz (29.9ox) bare bulb |
| Canon 600EX-RT |
= 1lb. 2.4oz (18.4oz) /w batteries |
Light Output:
All WS (watt seconds) displayed in this section are the advertised values from the manufacturer. All Guide Numbers (GN) were actually measured values using a Sekonic L-328.
All measurements are taken at max power output. Final readings are the average result of of 5 consecutive readings taken 15 seconds apart. The Canon speedlite was tested with fresh alkaline batteries and external power provided by a fully charged Quantum Turbo SC battery pack.
The x3200 & x1600 units are White-Lighting studio strobes from Paul C. Buff. These units provide two separate ranges of light. Guide Numbers (GN) for each power level were measured and documented.
The X800 unit is a White-Lighting studio strobes from Paul C. Buff. Unlike the X3200 & X1600 series, this unit does not provide two separate ranges of light.
All “X” series White-Lightning studio Strobes were fitted with a standard 7 inch reflector with NO diffuser.
The EX100-A is my lowest power studio light from Impact with an advertised and measured 100ws with a guide number (GN) of 80.
All GN values are not advertised but actual readings taken with my Sekonic L-328. All GN values were measured at ISO 100 @ 10ft.
All measurements are taken with the standard reflector as provided by the manufacturer of the associated light.
| Flash Unit |
W/S |
GN |
| x3200 |
1320 (full pwr) |
320 |
| x3200 |
330 (1/4 pwr) |
160 |
|
|
|
| x1600 |
660 (full pwr) |
220 |
| x1600 |
165 (1/4 pwr) |
90 |
|
|
|
| x800 |
320 |
160 |
|
|
|
| EX-100A |
100 |
80 |
|
|
|
| 1Canon 600EX-RT |
|
140 |
| 2Canon 600EX-RT |
|
56 |
|
|
|
| 3AD360ii-c |
360 |
190 |
| 4AD360ii-c |
360 |
140 |
|
|
|
| 5AD200 |
200 |
112 & 126 |
1 – Average of 2 Canon 600EX-RT speedlites (avg. of 5 flashes each)
2 – Average of 2 Canon 600EX-RT speedlites Sto-Fen Diffuser Installed
3 – AD360 with reflector, but NO diffuser
4 – AD360 with reflector and diffuser ON
5 – I had the opportunity to test a couple of Godox AD200TTL units in the studio. This test was carried out with the Frenzel Flash Head attached NOT the Bare Bulb. I tested 2 separate units and got two different readings.
As you can see by the above readings the Godox Wistro AD360II-C actually provides and extra 2/3 stop of light over the White-Lighting x800 and 1/3 less stop than a White-Lightning x1600 at full power.
Also, as you can see from the values above, the AD360 with reflector and diffuser attached provides the same output of light as the Canon 600EX-RT and/or Yongnuo YN600EX-RT bare flash. However, once you put a diffuser on the Canon and/or Yongnuo flash you loose about 2-stops of light (or 4 times less light). The big bonus is the quality of light you get with the Godox Wistro AD360II when used with light modifiers such as softboxes, umbrellas, where the bare bulb takes full advantage of the modifiers reflective inner surface.
Godox AD360II Flash Accessories
While the AD360II comes with a standard 4-3/4″ reflector & diffuser (AD-S2), there are quite a few light modifiers that fit the AD360. The following is a list. For some reason I can’t find what the AD-S8 and AD-10 are, it’s possible these represent discontinued modifiers.
AD-S2 Standard Reflector w/ Diffuser
AD-S3 13″ Beauty Dish (Hard Dish)
AD-S4 13″ Beauty Dish Grid
AD-S5 39″ White Shoot through umbrella
AD-S6 Umbrella Reflector
AD-S7 18″ Grid Octagonal Folding Softbox
AD-S8 18″ Grid Octagonal Folding Softbox Grid
AD-S9 Snoot w/ Grid
AD-S11 Color Filter Gels- Fits std reflector
AD-S12 Honeycomb Grid – Fits std reflector
AD-S13 63″ Light Boom w/ 1/4-20 thread
AD-S14 16ft Flash Extension power cable
AD-S15 Flash Tube Protector
AD-S16 33″ Light Stand
AD-S17 Wide Angle Soft Focus Diffuser
AD-S18 Shovel
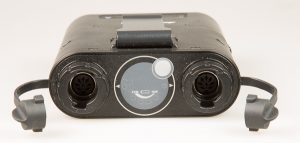
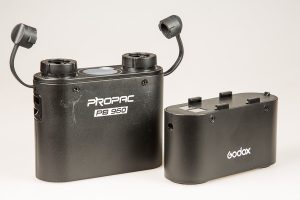
Godox ProPac PB960
This is an 11.1VDC, 4500mAH batter that is compatible with the Quantum Turbo but at a fraction of the cost. This battery is however about 75% larger.
This battery has two output power sources on the top which allows you to connect two separate flash units. This battery is compatible with Canon and Canon compatible flash units that allow an external battery to power the flash tube itself but not the electronics. In fact any flash that is Quantum battery compatible (with flash specific cable) will work with this battery.
|
  |
|
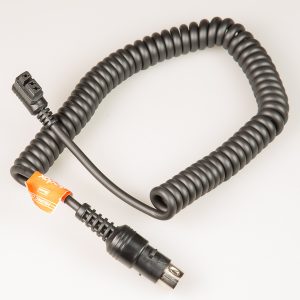
A flash-specific cable (image below) is used to connect the battery to the AD360 flash or any other flash using a flash specific cable. |
|
 |
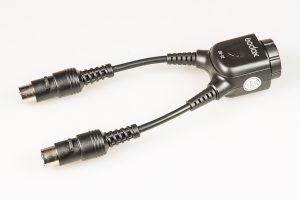
| If you need quicker flash recycling time, a Y-Adapter cable (image below) is available. The Y-Adapter connects to both ports of the battery, then you connect the flash specific cable to the Y-Adapter. As an example, when using a single cable with an AD360 at full power in Manual Mode, it took 5 seconds to recharge to full power. With a Y-Adapter it took a bit less than 3 seconds. |
 |
| Unlike the Quantum which has an internal non-user replaceable battery, the ProPac PB960 has a removable battery (image below). This allows you to keep a spare battery on extended shoots. Quite frankly I’ve yet to run out of power when used with my Canon 600EX-RT on extended weddings. |
 |
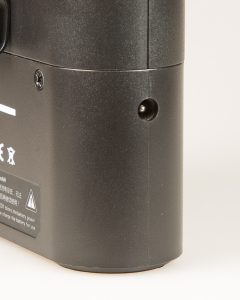
| The charger that comes with the battery supplies 12.6vdc @ 1.5A output and plugs directly into the battery itself. The charger (not pictured) has a single indicator that lights RED when charging and GREEN when the battery is fully charged. |
| The image below shows the battery charging port. |
 |
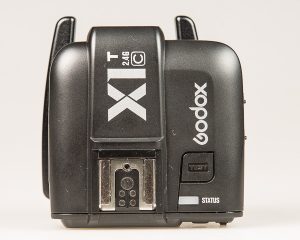
Godox X1T-C Transmitter [menu]
Unlike Canon’s ST-E3-RT transmitter which has all the controls of the Canon 600EX-RT Speedlite, the Godox X1T-C has limited controls.
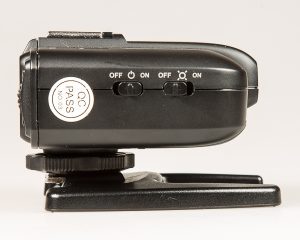
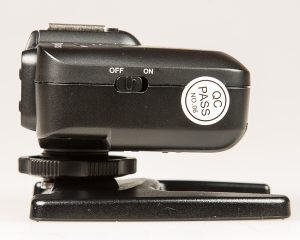
On the Right Side
- On/Off switch
- Focus Assist On/Off (nice touch, wish the Canon ST-E3 had one)
 |
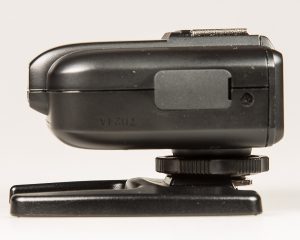
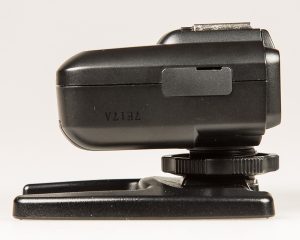
| On the Left Side
There’s a rubber (may be waterproof) cover that hides a
- mini-USB connector for upgrading the firmware.
- PC-Sync socket for connecting the Trigger to the camera’s PC-Sync port. When used with Godox X1R-C receivers this allows you to trigger devices like studio strobes. The default is to allow you to use the camera’s PC-Sync socket to trigger the X1T-C; since I don’t plan on ever doing this, I changed it to trigger external flash units or other single contact devices such a remote triggers. (C.Fn-03 = ou)
|
 |
On the Top
- Canon compatible hot-shoe. The X1T-N is Nikon compatible.
- Test Button (on top of the unit) fires the flash or wakes up the receivers
- Status indicator (lets you know when the transmitter & receivers are talking). The status indicator is a bit of confusion. It lights red whenever the Test Button is pressed. It lights red when the receiver (AD360 flash) is off or when the receivers (AD360 flash) is on a different channel and is unresponsive. According to the manual, the Indicator Light on the Transmitter and Receiver will turn red when there’s a connection. We’ll see when I get actual receivers as opposed to just a compatible flash
|
 |
On the back (along with the LCD display)
- CH/OK Button – Quick press and select the channel with the scroll dial.
- CH/OK Button – Long Press – Enables Fn functions, selectable by scroll dial.
- Mode Button – Selects TTL, Manual, Multi-Flash and Grouping
- GR Button – Allows you to set power levels for each flash grouping via scroll dial independently.
- GR Button – Allows you to GRoup all setting which allow you to change all setting simultaneously relative to one another via scroll dial.
- Scroll Dial –
|
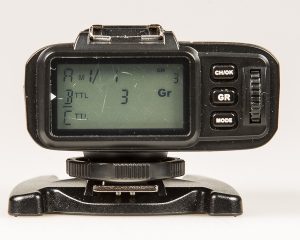 |
| The X1T-C has 32 frequency channels to pick from. Make sure you set the channel and receivers or compatible Godox flash units to the same channel.
You also have the ability to assign additional flash units to one of 5 groupings (A-E). You can assign your Key (main) Light to Group A, Fill Light to Group B, Background Light to Group C and Hair Light to Group D. However, unlike Canon’s ST-E3, you can independently set each grouping as TTL or manual or even turn off a group. As an example, you can set the Key Light to TTL, Fill light to TTL -1EV, then set the Background and Hair lights to Manual and adjust their output intensity independently and not subject to TTL metering. |
What you can’t do:
- Select High Speed Sync – unlike Canon’s ST-E3, the Godox transmitter automatically sets HSS (High Speed Sync) when you set the shutter speed over 1/250 sec.
- Select Curtain mode (front curtain/rear curtain) – Sets from the camera menu
- Select Flash Bracketing – Sets from the camera menu
- Select Manual Zoom – the AD360 has no zoom capability. However, Canon as well as other Godox flash units that work with this transmitter do and you can select Auto Zoom, No Zoom, or select a fixed zoom rate from the custom function menu.(c.Fn-02 = [AU] ). This is an improvement over Canon’s ST-E3 which automatically sets the zoom to 24mm and can not be overridden, not even in manual mode.
Setting of flash functions from a Canon menu will only work on cameras manufactured from 2012 on; not sure about Nikon. While I very rarely use the camera’s menu controls to set flash functions, for the purpose of this write-up I tried it and it does work. In fact the camera automatically identified the attached X1T-C as a transmitter.
Note: I set the X1T-C transmitter function to allow pass-through signals from the camera hot-shoe to the the X1T-C transmitter hot-shoe. (c.Fn-01 = — [off] )
Note: When using the X1T-C transmitter’s hot-shoe to host an attached speedlite, the channel that controls the attached speedlite is Channel “A” . All speedlite functions properly only when assigned to Channel “A”
I tried using a different channel and this is what happened:
- The Canon flash went into High Speed Sync mode and could not be reset.
- The Canon’s Modeling Light function arbitrarily turned on and off
- Adjusting the flash output +/- 3EV manually from the flash had absolutely NO result in flash out, it remained as +/- 0.0EV
- Adjusting the output +/- 3EV for grouping “B” from the X1T-C had absolutely NO result in flash out, it remained as +/- 0.0EV
- Adjusting the flash compensation can only be done from the camera’s menu, assuming the camera was built after 2012. This for me is a deal breaker for using a flash on the transmitter’s hot-shoe since I routinely make this type of adjustment (think zone system). Because of this revelation, I set c.Fn-01 = on. This turned off the pass-thru function and makes the hot-shoe behave as a single-contact unit. perfect for using it with my CyberSync studio triggers.
- It didn’t matter if the flash was in ETTL or ETTL Master of ETTL Slave, all the results remained the same.
Observations:
The power switch is easily nudged into the ON position. This device has no reliable power management system. While it will blank out the LCD to conserve power, if you put it away without turning the power off, it will be dead when you take it out in a day or so.
The focus assist beam died after a couple of weeks of use.
When I first received the X1Tc transmitter it takes a bit to get used to it and quite frankly weird stuff happens. There’s an arrow that points to the middle reading and the dial scrolls the display up and down through the available groups. There are two options for group settings (c.Fn-06) 3 (Group A,B,C) and 5 (Groups A through E).
At one point I set the groupings to 3 and after a while the display locked to show the 3 groupings with the scroll dial having no function other than adjusting the power levels. Stepping through the groups was now done through the mode button. After a while I decided to go back to 5 groups (c.Fn-06-[5]). Unfortunately the display never changed and no matter what I did I couldn’t get back to 5 groups. Final I searched online and found that I could reset the transmitter to factory defaults. That did the trick.
I decided to go back to 3 groups. I changed the custom function to 3 (c.Fn-06-[3]). The display now only shows 3 groups and you move between them via the scroll dial. No matter what I do I can’t get the groups to lock in place so that I can step through them with the mode button.
Regardless of the seemingly strange and inconsistent operation of the settings, the transmitter works great. I recently purchased an X1Rc receiver so I can use my canon flash units remotely with the X1Tc transmitter. The operation of the transmitter/receiver combo is flawless.
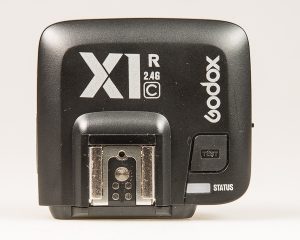
Godox X1R-C Receiver [menu]
The receiver is a simple device with just two major settings, Channel Selection and Group Selection.
- Would be great if there was a way to lock in the channel selection since it’s quite easy to inadvertently press the CH button and cause the channel to change. Then you have to go through all 32 channels to get back to where you were.
- On the Right Side
- On/Off switch (easily nudged into the ON position when storing)
|
 |
|
On the Left Side
There’s a rubber (may be waterproof) cover that hides a
- 2.5mm jack – used to remotely trigger a camera or a studio strobe. Cables are included for triggering studio strobe as well as camera specific cable for triggering shutter. (X1Rc = Canon, X1Rn = Nikon, X1Rs = Sony)
- USB Port – used to upgrade the firmware.
|
|
 |
|
On the Top
- Camera specific compatible hot-shoe. (X1RC = Canon, X1T-N = Nikon)
- Test Button (on top of the unit) fires the flash or wakes up the receivers
- Status indicator (lets you know when the transmitter & receivers are talking).
|
|
 |
|
On the back (along with the LCD display)
- CH Button – Quick press and select the channel (up to 32 channels).
- GR Button – Allows you to set the group used for the attached group. (5 Groups A-E
|
|
 |
|
The bottom of the receiver sports a metal cold-shoe with a standard 1/4-20 threaded hole for directly connecting to a standard light stand.
Set the flash as if you were putting it on the camera, no need to set it as a Master or a Slave. I tried starting it in both eTTL and Manual and it automatically changed in accordance with the settings of the transmitter.
The power switch is easily nudged into the ON position. This device has no reliable power management system. While it will blank out the LCD to conserve power, if you put it away without turning the power off, it will be dead when you take it out in a day or so. |
Conclusion
I have both Canon 600EX-RT and Youngnuo YN600EX-RT flash systems that work seamlessly with with either Canon’s ST-E3 or Youngnuo’s YN-E3-RT. While the primary operating frequency of these units and the Godox/Flashpoint transmitters are the same, they will not trigger each others flash units.
The Godox AD360II-C (Flashpoint Streaklight 360)
If you’re looking for a more powerful light to use on-camera, look elsewhere. This is a heavy unit, over 2 lbs. with reflector, with published warnings about mounting it on the camera’s hot-shoe. While the output is one stop hotter (twice the amount of light) than the 600EX-RT units, the AD360 is more suited to being used off-camera, either with the supplied cold-shoe stand or on a light stand. When used on-camera (yes, I did test it) the unit operated in either manual or full eTTL mode.
Where this light really shines (no pun intended), is with it’s off-camera bare bulb capability and vast array of light modifiers. As an example, when using a standard speedlite with an umbrella (reflected) there is significant loss of light and the light distribution is not very even. With the AD360 (with either bare bulb or umbrella reflector) the resulting light is much more even and the extra stop of light really helps. As I stated earlier in my write-up, this light produces almost 2/3 of a stop more light than my Paul Buff AB-800 studio light.
Another downside is the external battery and connecting cable. Unlike a speedlite which is all self-contained and quick to set up, the AD360 needs to be mounted (so does the speedlite), then you have to mount the separate battery pack to the light-stand, then connect the cable. There are a couple of screw-type clamps that can be purchased for specifically mounting the battery to the light-stand,and while I do have a couple, I found that using a 12″ zip-tie formed in a loop then super glued to ensure it won’t come apart, is the quickest way to mount the battery. Slip the battery through the loop then hang it on the light stand.
At full power the light is fully charged in about 4.5 seconds.
At 1/2 power the recycle time is about 1 second.
At 1/4 power the recycle time is significantly less than 1 second.
The flexibility of these lights far outweigh the negatives regarding setup time and separate components.
Godox X1T (Flashpoint R2) Transmitters
This is a simple but flexible transmitter. With 2 on/off switches, One for the Power and one for the focus beam. There are 3 mode buttons facing the back of the camera along with an LCD screen.
Once you get used to it, it’s a joy to use, however, if you inadvertently switch operating modes, it can take forever to figure out how to get it back to the default factory mode.
The top mounted hot-shoe allows you to mount a camera specific flash for use in full TTL or manual mode along with the AD360 mounted off-camera. Or you can mount a different transmitter, such as a Pocket Wizard or Paul Buff CyberSync to control your studio lights. I have actually used an AD360 on a boom as a hair or separator light along with White-Lightning X1600 series studio lights. The camera mounted X1T transmitter allows me to easily adjust the boom mounted output of the AD360, while the CyberSync triggered the studio lights.
For me, these lights are a great addition and allows me to create lighting scenarios that would otherwise cost me significantly more money. When used with the Godox X1R receivers, it allows me to fully integrate my Canon and Youngnuo 600EX speedlites with my Godox & Flashpoint 360 and my studio lights.
I hope you found this write-up informative and useful.